Thursday, February 28, 2013

Yes, I have a love affair with garlic


Thinking about dinner (Italian beef in the crockpot - easy peasy) led me to thinking I wanted to make some fries.  Maybe some garlicky fries.  Which led me to thinking I needed to roast some garlic - maybe for the fries, and definitely for some roasted garlic aioli to smather all over my Italian beef sandwich.  Then I saw a post from How Sweet It Is about roasted garlic oil, and I figured I could just do it all at once.  

I roast garlic often enough.  and I make a killer homemade garlic salt with a head of roasted garlic (don't worry, I'll show you how soon and then you'll be hooked, too).  Here's the garlic, all ready to go in the oven:
45 minutes later:  
Drain & cool....  then into a bottle.
and all this yummy roasted garlic


Garlic Aioli

1 cup mayonnaise
3-4 cloves roasted garlic, mashed with a fork
a little salt & pepper
a little lemon juice

Mix it all together & let sit in the fridge for while (an hour, anyway) to let the flavors meld.  Use on burgers, fries, sandwiches, crackers, chips, eat it off the spoon......

Wednesday, February 27, 2013

but sometimes, I don't do anything...

So far this week, I've done - um - a lot of not much. 


I bought laundry detergent &  fabric softener that look suspiciously alike.
Which will turn out badly.

I cooked a ham for dinner, and then made ham stock out of the bone.
Which means we'll have ham & beans soon!

I watched my twelve year old eat massive amounts of vegetables, including cabbage & brussel sprouts.  Which is amazing, and probably means we'll be buying him new shoes in a month.  You know, because we didn't just do that.

I read an entire book in one day, but haven't yet started my book for book club.  Which means I'll be reading all weekend to be ready for next week.


and, I love (LOVE) these new teabags!  

Monday, February 25, 2013

Soda Bread. Just do it... you'll be glad you did.


March is around the corner, which means St. Patrick's Day is almost here, which means everyone will be making corned beef.  I'm not really sure corned beef is particularly Irish, but neither is green beer, so we'll just let it go at that.  Soda bread is more Irish, but this is a recipe that deserves year-round love, not just in March.  It's moist & just a little sweet, and would perfect with any soup or stew.  This is a 'by hand' recipe, it goes together quickly and you probably have the stuff in your pantry.

Irish Rosie's Irish Soda Bread
3 1/2 cups flour
1/2 cup sugar
1/2 teaspoon baking soda
2 teaspoons baking powder
1 teaspoon salt
1 pint sour cream
2 eggs
1 teaspoon caraway seeds

1. Combine dry ingredients in large bowl.
2. In a small bowl, beat eggs and stir in sour cream.
3. Add egg & sour cream mixture to the dry ingredients.  Stir with wooden spoon, it will be really thick.
4.  Add caraway seeds.  Don't skip this part.  Even if you don't like them (I don't, really) it's just a little bit and they really add to the flavor of the bread.
5.You may need to knead with your hands a few times to get it incorporated
6. Place batter in a well-greased (I use parchment or foil in the bottom, too) 9" Springform pan.
7.  You may need to dust top lightly with flour so you can pat the dough into the pan.
8.  Make a shallow crisscross on the top.
9.  Bake 50 minutes at 350 F.
10.  Share with friends!

*I found this recipe online years ago.  You can find the original here.

Saturday, February 23, 2013

Minecraft Beanies


Just finished up these birthday gifts for my nephews - Minecraft Creeper Beanies.  If the term "Minecraft Creeper' is foreign to you, just ask someone - probably a male someone - under the age of 15.  Jack & I came up with the design last year when it was his turn to pick a beanie.  And check out my fabulous wrapping job -


Wednesday, February 20, 2013

Well.... That Went Horribly Wrong

Several weeks ago, I was completely suckered in by some adorably geeky painted glassware I found on Etsy.  (see here).  Go ahead, look, they are really cute. Mario flowers- how cute? right?

And, the way most things start, I said "huh.  I can do that." That very same day, my brother found the exact glasses I needed for this project- at the whooping price of 50 cents each.  Off to buy glass paints and some new brushes (apparently we I didn't move small paint brushes with us) and I was psyched (WOO HOO) to do this.

and....  here you go:


Now, go back to the cute Etsy ones & compare.  or not.  no need to.  This is even after  I washed off all the paint and started over a second time.  

Guess what?  They still hold wine.  So there.

Monday, February 18, 2013

A Green, Orange & White Nightmare...


I've been eyeing those ribbon wreaths on Pinterest...  they look like a ton of work.  Let me tell you, they are.  I was completely suckered in by a St Pat's day sample I saw -"oh, look!  I can do that! they want $100 for this one!  that's nuts!"

Well.  You can't pay me $100 to make another one.


 First, I cut all the ribbon and tied it.  Then I realized I'd cut all the ribbon twice as long as it needed to be.   


So I untied it all and cut it in half.  Because that's fun.   


I used a mixture of these floral pins, some T-Pins I stole from my mom, and regular pins. 


Partly because I knew I wouldn't have enough pins, and partly in an attempt to save time, I tied two ribbons to some of the floral pins.  In case you are wondering, it did not save time.


By this time, I was considering tossing the whole thing.   It took forever, and I'm not super happy with it.  It actually looks cuter in the picture than in real life.  With the 1/2 price ribbon, and the coupon for my Styrofoam wreath, and little clovers & pipe (the leprechaun came from my mom's stash), 
I spent less than $30.  


Thursday, February 14, 2013

Shopping Bag Hack (or, Best Idea EVER!)


I don't know about you, but I end up at the grocery store with a pile of shopping bags, my purse, and my list, all stacked in the front part of the shopping cart.  Typically my list falls to the ground somewhere around aisle 2, leaving me with no idea what I came in to buy.  So when I saw these on Sew4Home, my first thought was 'BRILLIANT!", and off I went to buy the stuff to put them together.

The instructions tell you how to double up the bags and even add an inside pocket.  I was just wanting the vinyl pocket on the outside to hold lists & coupons, so I skipped all the other steps.  I bought a medium weight vinyl ($4.99/yd + coupon!) and found a clearance fabric that matched the bags without being too annoying.  I now own a lot of vinyl, by the way.


Vinyl needs a little love if you want to sew on it - I used masking tape to hold it in place (don't sew over the tape) and wax paper over the whole thing.


 Really, how fun is this?!  I'm excited to go to the store now.  well, maybe not excited...


Wednesday, February 13, 2013

Ironing Board Diva


Yes, I really just did this.  I re-covered my boring, ugly ironing board. And now it's FABULOUS.

I've just discovered Sew4Home.com, a completely addicting and inspiring website full of great ideas and tutorials.  This is the tutorial/pattern I used for my cover, except I added the stripe at the pointy end instead of the straight end of my board.  Basically, you just need to add enough around the edges for the depth, a hem, and a casing.  I used white cording, the pattern uses ribbon.  I wanted to get a solid knot when I tied it, and was afraid the ribbon may not allow me to do that.

I bought a new ironing board pad at Joann's- using my 40% off coupon, of course (I think it was $9 originally).  And, WOW, check out the difference between the old and new pad!


The annoying part of this project is that you have to take apart your ironing board to trace the pattern, then put it back together to press your fabric.

I love this Michael Miller Dress Forms  fabric (from Fabric.com), and the pink is from Hobby Lobby.  My mom will be proud; I rinsed & dried the pink fabric before using it.  I was a little concerned it could fade & transfer onto whatever I may be ironing.  Which would be bad.  

All in all, it took about an hour to put together.  And it's SO CUTE!!  
see my messy craft room?


Tuesday, February 12, 2013

Curtain, Curtain, Cheap, Cheap!!

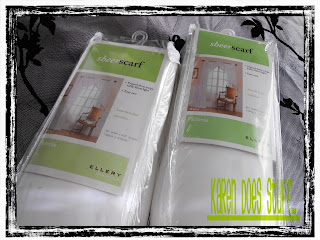
Because the clearance section at Hobby Lobby is right next to the yarn section  (and I spend most of my time at HL in the yarn section), I've been eyeing these babies for a while:

I knew they'd be perfect for our bedroom.  I'm also completely cheap, especially about things like this, so I watched, and waited...   originally $9.99, down to $5.99, but I got them for ... $2.15 a pair!!  


Off to my favorite place to buy super cheap curtains- Big Lots.  I think I need to point out here that I'm not a good 'dollar store shopper'.  It's a little too much  in & out, wandering around, not finding what you want, too much junk, for me.  But we have a kinda nice Big Lots store here, and their sheer curtains are much cheaper than, say, Walmart, if you can find what you want.  

And I did!  Two white scarves, $12 each...  

I even did the right thing, and washed them first to get the creases out.  Yes, this is something I had to think about.  Even better, I'd planned ahead  and got my handyman to hang the hardware over the weekend.  and by 'handyman', I mean husband, of course.


Me.  Happy.  All for about 30 bucks!!

Friday, February 8, 2013

Green Beans - Jacked Up

You know, like if you took regular green beans, added a veil & sparkly earrings, and sent them to stand in front of their bitchy friends.  or, if you don't get the Say Yes to the Dress reference, then just add some WASABI & GARLIC to them- and you'll be hooked. 

I ran across this recipe the other day and instantly went out looking for Wasabi Powder.  I've never looked for this before, I'm not even sure I knew it existed, but I can tell you I'll be looking for lots of ways to use it now.  
 

By the way, I found it at Wal-Mart, in the Asian food aisle.  

Go check out the recipe, and the whole Tasty Kitchen website.  We loved these green beans.

Thursday, February 7, 2013

Project: Long Over Due

Yes, I scrapbook.  Have for years. But like anything it goes in spurts.  Last winter, in an attempt to clean out ten years of scrapbook stash so I didn't have to move it, I got through a lot of pictures.  And stash.   And now it's time to get back to it!  I think I've had this black frame for, oh, three years?  And the paper at least that long.  Which all makes it the right thing to use for pictures that are almost four years old.  

I did go buy a new paper trimmer though.  I've gone through lots of those, too.  So far, I like it.  It cut smoothly and seemingly straight.  


Fiskars Sure Cut Deluxe Trimmer, in action
I've been putting off doing anything with the pictures from our June, 2009 family trip to Puerto Rico.  Might be the fact I have 300 pictures, and I hate to journal, and a big family trip album kind of needs journaling. I'd put off using this tray because it needs a theme, and, well, that's not always easy to come up with.  

work in progress

The paper is a Fancy Pants collection, Summer Soiree, which I'm sure is long discontinued.  It's a little to pastel-y for me, but works well with the photos.  I am pretty happy with the final product, and was told I need to do one for every trip.  Which would solve the problem I apparently have of scrapbooking vacations.  


And this is why I don't do projects often:  I make a huge mess.  Always. 


Tuesday, February 5, 2013

Meat & Cheese, All Rolled Up

yyyuuummmmm, Stromboli
My brother is the Pizza King, and I'm sure as the weather warms up we'll have lots of mouth-watering pizza posts from his wood-fire oven, but this is my homemade pizza go-to...  Stromboli.  Salami, pepperoni, Italian sausage and a mix of cheese all rolled up in crusty goodness.  If you are scared of yeast, I really recommend starting with a pizza dough.  It's super easy and you probably won't screw it up.

 Really.

Yes, you may have to buy a thermometer, but that's cheap and right there in the kitchen gadget grocery store aisle.   The make or break yeast rule is temperature- the liquid (in this case water & sugar) needs to be lukewarm, somewhere around 110 degrees.  I usually microwave the liquid 20-30 seconds and then wait for it to cool down. The only other baking-with-yeast rule I try to remember is 'quit while you're ahead'.   Don't add too much flour, don't over work it, don't over think it.

My stromboli was layered with salami, pepperoni, sausage, pizza cheese, cheddar cheese, and some shaved Parmesan.  The kicker ingredient is a little caramelized onion & roasted garlic- a little goes a long way; I made 2 loaves with one onion & one head of garlic.  Of course, you can DO WHATEVER YOU WANT TO.  It's pizza, go for it!

20 seconds in the mircowave
You can find lots of 'how to make stromboli' recipes & videos on the web.  I will offer this quick tip though- microwave your pepperoni for a very few seconds (too long & it looks like dog food).  This removes some of the excess grease (see, look  ---- ewwww!)


This is a recipe I got from a Dierbergs cooking class I took years ago. I can make one recipe of this dough & get a small sized cheese pizza & a stromboli out of it.

Basic Pizza Dough


1/2 cup warm water (between 105-115 degrees F)
1 teaspoon sugar
1 package (2 1/4 teaspoons) active dry yeast
Dissolve sugar in water.  Stir in yeast & let stand for about 5 minutes until it begins to foam.


In large bowl, add:
3 cups flour
2 teaspoons salt

This is a good time to add some seasonings to your dough.  Italian seasoning, basil, oregano, garlic, Parmesan or Asiago cheese - whatever you want.  Make a well (that's a hole) in the middle of the flour and pour in yeast mixture.

Add:
3 Tablespoons Olive Oil
3/4 cup milk, at room temperature

If you want to add any liquid flavorings (like, a buffalo chicken pizza  might need a dash of hot sauce in the dough), add that with the milk & oil.

Stir until dough forms.  I use my Kitchen Aid with dough hook, but you can do this by hand, and I think you can do it in your food processor, too.  Turn dough out onto a counter top/bread board/large cutting board with about 1/2 cup flour spread on it.  Knead it by hand just a few times, using enough flour to make it manageable but still a little bit sticky.  Cover with towel & let rest for about 10  minutes before shaping dough.

Make it into pizza, bread sticks, a calzone, stromboli...

Monday, February 4, 2013

So Does Her Brother - Brewnight, Traditional Scottish Ale

Todays Brew - A Scottish Ale brewed with Heather Flower and Honey.  There are many modern takes on a Scottish Ale but I am endeavoring to go really old school.

The first old school thing - No hops in this beer, it is bittered and flavored with Heather Flowers. Hops are not native to Scotland. Old world Scottish brewers had to use herbs and spices to balance out the sweetness of the malt.  Since Scotland has so much heather they write songs about it, one can see how  Scottish brewers would brew with it.

I was thrilled to find dried heather flowers at the local brew shop.  It was suggested that fresh was the way to go, but since my Moors aren't pink with heather, I'll settle for the dried.

The heather added a very new smell to brew day.  Instead of the aggressive bouquet of hops, the kitchen smelt of tea.  I likened it to chamomile, but at the end of a lively debate we agreed just to call it a tea smell.


The second odd and traditional part of the brew was the kettle caramelization.  This involved taking the first gallon of wort (unfermented beer) and boiling it down by half.  It was much like making candy.

Once the wort was reduced, it started a thick roll.  That is when I pulled it off the heat and added it to the boil.   Supposedly this was used to deepen the flavor of the beer. 
At the end of the boil I added 2 pounds of pasteurized honey.
I used a traditional Scottish yeast.  Since it isn't traditionally warm in Scotland, this will ferment at a lower temp.  Cooler fermenting is slower, as is fermenting honey.  It will spend a month sitting there happily bubbling away at 60 ish degrees.  Then another month in the bottle!  Agony!

I will keep you up to date with a brew-review come spring.  Now for a clever name - I'm thinking Galloway something as a nod to the Scottish Side of the family. 

Karen, you may have your blog back now.  Thanks for sharing! 

Saturday, February 2, 2013

Groundhog Day Menu Planning

What, you don't celebrate Groundhog day?  I think you should, by making this:


Michael Symon's Pork Pie (recipe found here)

My mom & I made this one a few weeks ago.  I knew it would make way too much for just the three of us; come to find out it makes way too much for five.  This could easily serve eight.  We did the double crust version (we used pre-made crusts - not because we can't make pie crust, but this didn't seem like a recipe that was going to live or die by a homemade pie crust) but just a top crust is all you need.  

This is a recipe in his new cookbook, Carnivore, which I'm excited to say I just got my hands on this weekend.  So expect more meaty goodness coming your way!  

Friday, February 1, 2013

Not Microwave Popcorn

OK.  We love popcorn. Real popcorn.  Made in a real Whirley Pop popper.

About twice a year I'll buy microwave popcorn, and hate it.  I burn it, it smells bad, blah blah blah.  For a while now I've been seeing 'make your own microwave popcorn at home' things.  Really?  I mean, really?

Well, yeah.  It works.

Paper bag, 1/3 - 1/2 cup popcorn.  Roll the bag over & stick it in the microwave.  As with any microwave popcorn, stand and watch it.  Mine took about about 1 1/2 minutes. I used 1/2 cup, but won't use as much next time.  There were some unpopped kernels, and my bag opened at the bottom, but I will do it again for sure.

and guess what?  No weird stuff.  It's popcorn.  THAT'S ALL.  Add your own butter & salt.